Most detailers attack ventilated seat perforations with an upholstery cleaner and a brush. That is exactly how you turn a surface-level clog into a fan replacement job. This article breaks down the correct mechanical approach — why the holes block in the first place, what happens inside the seat when you use liquid, and the only method that actually clears the debris without pushing it deeper.
Key Takeaways
- Liquid cleaners are the wrong tool for perforated ventilated seats. They carry debris through the 1.5mm holes and into the spacer mesh layer directly above the fan intake, compounding the blockage.
- Clearing the holes requires pressurized air at 90 PSI minimum and a micro-crevice vacuum working at the same time — one without the other moves the debris in the wrong direction.
- The order of operations matters as much as the tools. Dry extraction before any air application is what separates a clean result from a pushed-in mess.
Why Ventilated Seat Perforations Block So Easily

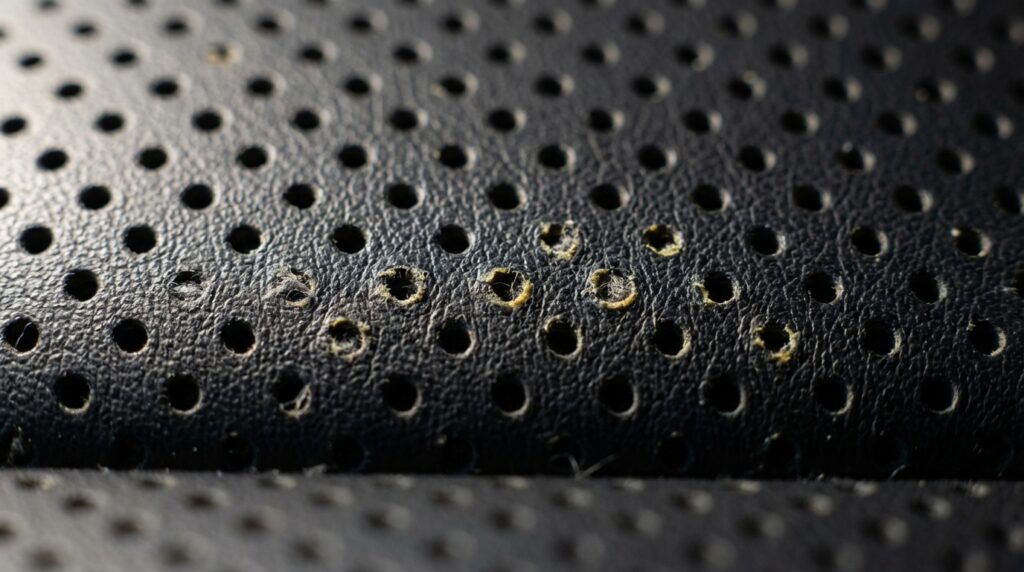
The perforations in a ventilated or cooled seat are not decorative. Each hole is a precisely sized air passage, typically around 1.5mm in diameter. That is smaller than a standard sewing needle’s eye. At that size, a single grain of salt-sized skin cell debris, a compressed denim fiber, or a hardened skin-oil deposit is enough to create a partial seal.
The seat draws air actively downward through those holes when the cooling function runs. This means every hour of use with the ventilation on is also pulling fine particulate matter into the perforation. Over time, that material compresses and dries. You end up with a plug, not just a surface smear.
The leather or perforated vinyl surface sits on top of a spacer mesh layer — a 3D knit structure that creates the air channel between the seat surface and the fan. When the perforations are blocked, the airflow drops. The fan works harder. The cooling performance you feel drops noticeably.
The Liquid Cleaner Problem: What Actually Happens Inside

Here is where most first-time attempts make things worse.
Spraying an upholstery cleaner, a foam cleaner, or even water onto blocked perforations does one thing reliably: it suspends the debris and carries it through the hole. The liquid follows the path of least resistance. In a ventilated seat, that path goes straight down — through the 1.5mm opening, into the spacer mesh, and toward the fan housing.
Once that suspended debris dries inside the spacer mesh, it is bonded to the 3D knit fibers. The fan draws air through that mesh. Any debris captured in the mesh now acts as a filter — one that gets denser with every cleaning attempt that uses liquid.
You are not cleaning the seat. You are re-depositing the problem somewhere harder to reach.
This is not a hypothetical. The biggest mistake I see beginners make in the shop is reading “upholstery-safe cleaner” on the label and assuming safe for the fabric means safe for the system. It does not. The cleaner can be completely non-damaging to leather and still physically relocate debris into a mechanically inaccessible layer.
Before You Touch a Tool: Dry Assessment First

Look at the seat surface in raking light — a flashlight held low and flat across the surface works well. You are looking for two things:
- Surface-level plugs: Debris sitting at or just above the perforation opening. These have a slight raised appearance and often show a color difference.
- Subsurface plugs: Holes that look clear on the surface but have no airflow when the ventilation runs. These are blocked below the leather layer.
Run the seat ventilation and hold the back of your hand about 2cm above the leather surface in a grid pattern. Mark blocked zones with a wax pencil or masking tape tabs. This tells you exactly where to focus and gives you a before/after benchmark.
The Correct Tool Setup: Pressure Air and Vacuum Simultaneously

Restoration of blocked perforations requires two tools working at the same time:
- A pressurized air nozzle delivering at least 90 PSI of regulated, dry compressed air through a fine-tip nozzle — ideally a 0.5mm to 1mm tip diameter.
- A micro-crevice vacuum attachment — a narrow, rigid plastic tip, typically 3mm to 5mm wide — connected to a high-suction vacuum.
The nozzle blasts the debris loose. The vacuum captures it immediately at the surface before it can travel downward. If you blow air without the vacuum running simultaneously, you are just relocating the plug. It will move somewhere: into an adjacent hole, into the spacer mesh, or deeper into the perforation channel.
| Tool | Specification | Purpose |
|---|---|---|
| Compressed air nozzle | 90 PSI minimum, fine tip (0.5–1mm) | Fractures and dislodges the hardened plug |
| Micro-crevice vacuum tip | 3–5mm wide rigid tip | Captures debris at the surface in real time |
| Compressor moisture trap | Inline filter/separator | Prevents water vapor from entering the holes |
| Wax pencil or tape tabs | Any | Marks blocked zones before starting |
A moisture trap on your compressor line is not optional here. Sending humid air through a 1.5mm hole into a foam-and-fabric system creates a mold risk. Use a refrigerated air dryer or an inline desiccant filter between the compressor and the nozzle.
Step-by-Step: Clearing Hardened Perforation Plugs
Step 1 — Dry Surface Extraction
Before any air, run your micro-crevice vacuum over the entire seat surface at slow speed. Hold the tip nearly flat — nearly parallel to the surface — so it shears across the perforations rather than pressing into them. This pulls loose surface material away without pushing anything into the holes.
Do not press the vacuum tip hard into the leather. You will deform the perforation edge on softer leathers and potentially close the opening further.
Step 2 — Set Up and Test Your Air Pressure
Set your regulator to 90 PSI and test the air on the back of your hand. It should feel firm and sharp — not misting, not damp. A dry, sharp air stream means your moisture trap is working.
Hold the nozzle tip roughly 5–8mm above the surface, not pressed into the hole. Pressing the tip into a 1.5mm perforation at 90 PSI can stress the surrounding leather. You want the air to enter the hole, not force the tip into it.
Step 3 — Work Each Blocked Zone With Both Tools Running

Position the vacuum tip adjacent to the nozzle — not on top of the same hole, but immediately next to it, 5–10mm away. Turn the vacuum on first. Then apply the air bursts in 1–2 second pulses.
When you are actually standing over the seat doing this, the physical feedback is clear: you will feel the vacuum pull increase slightly as the debris releases, and the airflow from the nozzle will shift from a slight back-pressure sensation to a free, unobstructed flow. That change in resistance is your signal that the hole has cleared.
Work in rows. Mark cleared holes with a second color wax pencil if needed. Do not rush a stubborn hole — repeat the pulse-and-vacuum sequence 3–4 times before moving on.
Step 4 — Post-Clearance Airflow Verification
Once you have worked through all the marked zones, run the seat ventilation again and repeat the hand-grid test. You should feel a measurable increase in airflow across the cleared zones. In most cases, full clearance restores the airflow to close to original specification.
If certain holes still show no flow despite repeated air pulses, the blockage may be seated in the spacer mesh rather than the perforation channel. That layer is not accessible from the seat surface without partial disassembly.
Surface Care After Clearing: What You Can — and Cannot — Apply

Once the perforations are clear, many detailers want to condition or protect the leather immediately. This is fine, but with one hard rule: do not use any product that migrates into the perforations.
| Product Type | Safe for Use After Clearing? | Reason |
|---|---|---|
| Water-based leather conditioner | Use with caution — apply thin coat only | Liquid can re-enter perforations and reach spacer mesh |
| Dry microfiber buff only | Yes — safest option | No liquid introduced |
| Solvent-based protectants | No | Risk of degrading spacer mesh foam underneath |
| Foam leather conditioners | No | Foam collapses into holes and re-plugs perforations |
| Ceramic-infused spray protectant | Only on surrounding non-perforated panels | Can seal the perforations permanently if applied over them |
The safest post-clearance practice is a lightly dampened microfiber — just enough moisture to clean the leather surface — applied with low pressure and buffed immediately before any liquid can enter the holes.
How Often Do Ventilated Seat Perforations Actually Need Clearing?
It depends heavily on usage. A daily driver in a hot climate with the seat cooling running constantly will accumulate debris significantly faster than a weekend car. In most cases, perforated seats in high-use vehicles show measurable airflow reduction within 12–18 months of use without any maintenance.
A few specific conditions that accelerate blockage:
- Passengers who wear heavily linty fabrics — fleece, chenille, and some denim weaves shed fibers that the fan actively pulls into the holes.
- Frequent use with sunscreen or skin lotion — these products leave oil-based residue that binds debris inside the perforation channel.
- Eating in the vehicle — fine food particulate is small enough to enter 1.5mm holes and compact under pressure.
Proactive maintenance every 6–12 months using the dry surface extraction step alone — no air, no liquid, just the vacuum — can significantly slow the rate of full blockage.
Frequently Asked Questions
Can I use a standard shop vacuum instead of a micro-crevice attachment?
A standard shop vacuum nozzle is far too wide to create the localized suction needed next to an individual perforation. Without that concentrated capture zone directly adjacent to the air nozzle, the blown debris simply scatters across the seat surface or drops into neighboring holes. The micro-crevice tip — rigid, narrow, 3–5mm — is what creates the controlled extraction zone that makes the simultaneous method work.
What if the blocked holes are on a suede or Alcantara seat surface?
The 90 PSI method is too aggressive for Alcantara and suede-finish seats. Those materials have raised fiber structures that will distort or crush under direct high-pressure air. For those surfaces, a low-pressure blower at 20–30 PSI combined with a very fine-tip vacuum is the safer approach, accepting that results will be partial rather than complete.
Is it possible to over-clear a perforation and damage the leather around the hole?
Yes, depending on the leather grade and age. On aged, dried-out leather, the edges of a 1.5mm perforation can crack or tear if you repeatedly press a nozzle tip into the opening. Keeping the air nozzle 5–8mm above the surface and using short air pulses rather than sustained pressure reduces this risk significantly in most cases.
Will clearing the perforations fix seat cooling that feels weak?
It depends on whether the reduced airflow is the cause of the problem. If the seat ventilation fan is operating but output feels weak, and your hand-grid test confirms that specific zones have low or zero airflow, clearing the perforations will likely improve performance. If airflow is consistent across the surface but still feels insufficient overall, the issue may be elsewhere in the system — outside the scope of perforation maintenance.
Your Next Step
Map your blocked zones today — before the next detail. Run the ventilation and do the hand-grid test. Mark what you find with tape or a wax pencil. That 10-minute diagnostic tells you exactly what you are dealing with before you ever pick up a tool. From there, build your setup: regulated dry air at 90 PSI, a fine-tip nozzle, and a micro-crevice vacuum running simultaneously. That combination, worked in disciplined rows with short air pulses, is the only method that clears the plugs without creating a worse problem underneath the leather.
