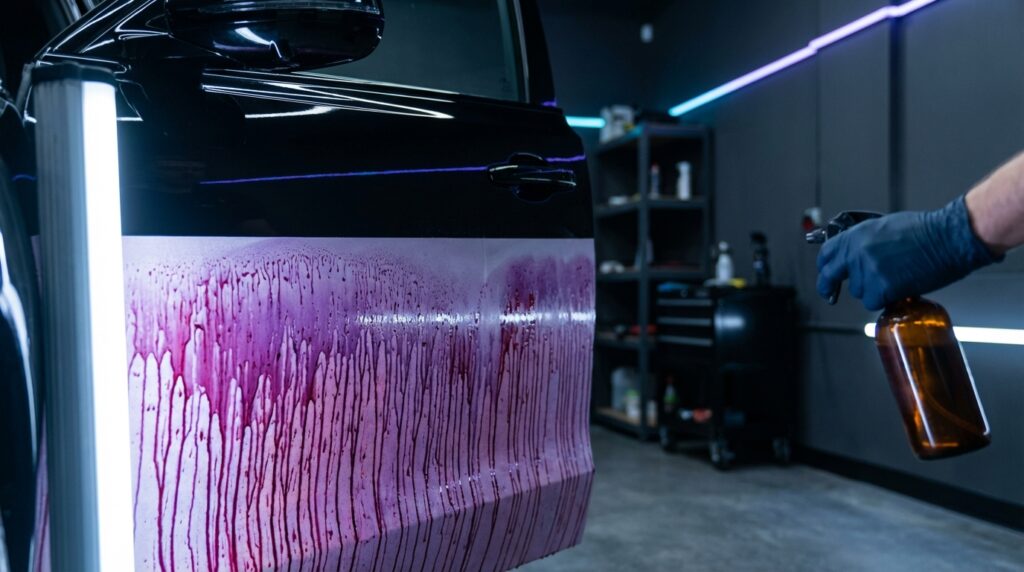
Most detailers know the visual. You spray a wheel cleaner or paint decontaminant, wait a minute, and watch the surface bleed vivid shades of purple and red. It looks dramatic. It feels satisfying. But if you don’t know why it happens, you’re missing critical information that changes how you use these products — and how you troubleshoot them when they underperform.
This article breaks down the actual chemistry behind that color change, explains what it tells you about your vehicle’s contamination level, and gives you the practical knowledge to use iron removers more effectively on both wheels and painted surfaces.
Key Takeaways
- The purple color is not a dye or indicator added to the product — it is the byproduct of a specific chemical reaction between Sodium Thioglycolate and ferric iron particles. Understanding this distinction changes how you read the reaction on the surface.
- Not all iron contamination is visible before you spray. Sintered brake dust particles embed into clear coat at a microscopic level and appear as a clean, smooth surface to the naked eye.
- The intensity and speed of the color change gives you real diagnostic information about contamination load — but only if you know what conditions affect the reaction rate.
What Is Actually Embedded in Your Clear Coat

Brake dust is not loose powder sitting on top of your paint. When a brake rotor and pad make contact under heat and friction, microscopic particles of iron break off at extremely high temperatures. These particles are ejected outward, land on the wheel face and painted bodywork, and — because they are still hot — they physically sinter into the surface.
Sintering means those iron particles fuse into the top layer of your clear coat. They are not sitting on the surface. They are in it.
This is why a pressure wash, foam cannon, or even a clay bar without a dedicated chemical will not fully remove iron contamination. The clay bar addresses some surface-level particles, but embedded, sintered fragments need a chemical that can react with them directly. That is where Sodium Thioglycolate does its job.
The Chemistry, Explained Without a Lab Coat

Sodium Thioglycolate is the active ingredient in virtually every pH-adjusted, color-change iron remover on the market. It belongs to a class of compounds called thiols — molecules that contain a sulfur-hydrogen bond, written as –SH. That sulfur group is highly reactive with iron, specifically iron in its oxidized ferric form (Fe³⁺).
Here is the reaction sequence when you apply the product:
Step 1: The Sodium Thioglycolate solution penetrates the surface layer and makes contact with embedded iron particles.
Step 2: The thiol group in Sodium Thioglycolate attacks the ferric iron (Fe³⁺) from the sintered brake dust particles.
Step 3: The reaction forms a new compound: iron(III) thioglycolate.
Step 4: Iron(III) thioglycolate exhibits that characteristic deep purple-to-red color. It is also water-soluble — meaning it can be rinsed cleanly off the surface.
The key point here: the color change is not a pH indicator, and it is not a dye added to help you see where you’ve sprayed. It is the reaction product itself. The purple you see is the contamination, chemically converted and ready to be washed away.
Why This Matters More Than Most Detailers Realize
Here is the distinction that separates a working detailer from someone just following a label: no color change does not automatically mean no contamination.
The reaction rate of Sodium Thioglycolate with ferric iron is directly affected by temperature. Below about 10°C (50°F), the reaction slows dramatically. In a cold winter shop, you might spray a product, wait two minutes, see minimal color development, and conclude the paint is clean. In most cases, the chemistry simply hasn’t had time to work at that temperature.
The biggest mistake I see beginners make in the shop is pulling the trigger on a rinse too soon. They spray, they see light bleeding start at 60 seconds, and they assume that’s all there is. What they don’t realize is that a heavily contaminated surface, especially on the lower panels and rear quarter behind the wheel arch, will continue developing color for three to five minutes given adequate dwell time. Cut it short and you rinse away product that hasn’t finished converting the contamination.
Correct dwell time varies by product concentration and ambient temperature. As a working rule: let the product work until the color change visually slows or stops progressing, before it dries on the surface. If you see the product beginning to dry at the edges, you’ve gone too long. Add more product or move to a cooler panel.
Reading the Color Change as a Diagnostic Tool

The bleeding reaction is not just visually satisfying — it gives you quantitative information about contamination load if you know how to read it.
| Color Change Intensity | What It Indicates | Recommended Action |
|---|---|---|
| Faint pink blush, slow to develop | Low to moderate iron contamination | Single application, standard rinse |
| Medium red-purple within 2 minutes | Moderate contamination, likely rear panels or daily driver | Full dwell, agitate with soft brush on wheels |
| Deep purple, fast reaction under 90 seconds | Heavy contamination, high brake dust vehicle | Repeat application after first rinse |
| No reaction at all | Either clean surface OR very low temperature | Warm the surface or product, retest |
| Reaction only on wheel face, none on barrels | Surface iron only, barrels may be sealed | Standard protocol, check barrel seal |
When you are standing over the hood of a car, specifically a dark-colored vehicle that has had its last decontamination 18 months ago, the color development can be startling. The entire lower third of the doors can bleed uniformly within 90 seconds. That is not the product “working extra hard.” That is a genuine contamination map of where brake dust migrates during normal driving.
Wheels vs. Paint: Same Chemistry, Different Application Protocol

The reaction is identical on both surfaces, but the practical approach differs.
On wheels, you’re dealing with higher contamination density, especially on the barrel face near the caliper. Cast aluminum wheels have microscopic porosity where iron particles accumulate in clusters. Spraying and letting the product dwell passively works, but agitating with a dedicated wheel brush during the dwell period — not before it, not after you’ve started rinsing — physically helps expose more contamination sites to fresh product. The brush contact keeps un-reacted Sodium Thioglycolate in contact with embedded particles.
On painted clear coat, mechanical agitation during the dwell period is counterproductive and potentially damaging. The product needs to do its work chemically, not mechanically. Wipe or brush pressure while the product is active can introduce marring, especially on softer clear coats. Let it dwell. Rinse. Follow with a clay bar if the surface still feels rough under a plastic bag test.
The pH factor matters here. Most iron removers are formulated to be slightly alkaline to neutral. Highly acidic wheel cleaners are a different product category — they strip contamination through acid etching rather than through a targeted chemical reaction. Depending on your clear coat hardness and alloy wheel type, mixing up these two product types can cause surface damage. Read the label for intended surface compatibility before you spray anything.
Why Some Vehicles Show Almost No Reaction — and What To Do

Occasionally you’ll work on a vehicle that shows very little color development despite obvious surface roughness on the clay bar test. Several factors explain this:
- Ceramic coating or paint protection film: These barriers reduce direct contact between the Sodium Thioglycolate and embedded contamination. Iron remover still works, but dwell time should be extended. Some professional-grade formulations at higher concentrations are better suited here.
- Surface temperature above 35°C (95°F): High heat accelerates evaporation of the carrier solvent before the reaction completes. Working in direct afternoon sun on a dark vehicle is a common reason for disappointing results.
- Ferrous contamination that has fully oxidized to Fe²⁺: Sodium Thioglycolate reacts specifically with Fe³⁺ (ferric iron). Older, heavily rusted particles that have fully converted to ferrous oxide may not produce the same visible reaction. The clay bar becomes more important in this scenario.
Comparing Iron Remover Formulation Types
| Formulation Type | Active Mechanism | Best For | Limitation |
|---|---|---|---|
| Sodium Thioglycolate (neutral/alkaline pH) | Chelation + color-change reaction with Fe³⁺ | Paint decontamination, coated wheels | Slower on cold surfaces |
| Acidic wheel cleaner | Acid etching of contamination and oxidation | Bare alloy, heavy brake dust buildup | Not safe for painted or coated wheels |
| Iron remover + fallout remover combo | Thioglycolate + broader chelating agents | One-step all-surface decon | Higher cost, variable dwell guidance |
| pH-neutral iron remover | Thioglycolate in water-based neutral carrier | Sensitive clear coats, PPF surfaces | May require longer dwell time |
FAQs
Does the product stop working if the color change fades while still wet?
No. The color fading while the product is still wet typically means the reaction has completed in that zone — the iron(III) thioglycolate compound has fully formed and is ready to be rinsed. It does not mean the product deactivated. Rinse normally and inspect.
Can I use an iron remover on matte or satin finishes?
In most cases, yes — but verify with the product manufacturer first. The chemical reaction itself is not finish-specific. The risk with matte surfaces is contamination of the texture during the rinse phase if the product dries into the surface. Keep dwell times conservative and rinse thoroughly.
Why do some iron removers smell so strongly of sulfur?
Sodium Thioglycolate contains a thiol group — the sulfur-hydrogen bond. Thiols are the same class of compounds responsible for the smell of natural gas odorants. The smell is inherent to the chemistry. A stronger sulfur odor does not indicate higher concentration or better performance; it reflects the specific formulation’s pH and carrier chemistry.
How often should I use an iron remover compared to claying?
These are not interchangeable steps. Iron remover specifically addresses embedded ferric contamination through a chemical reaction. Clay addresses surface-bonded contamination mechanically. On a typical daily driver, a chemical iron decontamination step every 3 to 4 months — before polishing or coating — is reasonable. Clay bar frequency depends on what the surface feel tells you, not a fixed schedule.
What to Do Next
Before your next detail session, grab a spray bottle of iron remover and test it on a single panel — not the whole car. Watch the timing and intensity of the color development. Take a mental note of where it bleeds fastest. That map tells you exactly where contamination is highest, which should directly inform how much dwell time you give each zone.
If you’re seeing minimal reaction on a car you know is dirty, check your product temperature first. Warm the bottle in a bucket of warm water for five minutes and retest. The chemistry works when conditions are right. Give it the environment it needs and the surface will tell you everything you need to know.