It’s one of the most frustrating moments in smart gardening. You check your app, and it confidently shows your prized monstera is “Wet” with 95% moisture. But you stick your finger in the soil, and it feels dusty and dry. Your first thought is: “This expensive gadget is broken.”
Here’s the good news: it’s almost certainly not broken. This is one of the most common problems indoor gardeners face when they start using smart sensors. The issue is almost always a misunderstanding between the tech, the soil, or your placement.
Hi, I’m Priya Verma. My journey into smart gardening started about five years ago, purely because I was tired of killing my fussy calatheas. I dove head-first into testing every sensor and automation I could find, figuring out what actually works versus what just looks cool. After countless trials (and a few errors!), I’m here to share the simple, practical lessons I’ve learned to help you build a thriving indoor garden without the guesswork.
Let’s dig in and figure out why your sensor is giving you that “wet” reading and how to fix it for good.
First: Why “Feel” Can Be Deceiving (And Why Your Sensor Might Be Right)
Before we blame the sensor, we have to talk about the “finger test.” It’s a classic for a reason, but it has one big flaw: it only tells you what’s happening at the very surface.
Your finger might tell you the top one or two inches are dry. But three inches down, where the sensor probe is sitting, the soil could be genuinely soggy. This is especially true in deep pots. Water naturally drains downward, leaving the top to dry out from evaporation while the bottom remains a swamp.
This is a perfect recipe for root rot, a silent killer where the roots suffocate and decay in waterlogged soil. Your plant’s leaves might even look wilty (which we mistake for thirst), but it’s really because the roots are dying and can’t absorb any water.
Your sensor is placed in that root zone. It’s not measuring the surface; it’s measuring the conditions where it matters most. So, the first possibility is that your sensor is right. It’s warning you of a problem before you can feel it.
The Most Common Culprit: Bad Contact and Mineral Buildup
In my experience, 90% of “wet-but-dry” sensor readings come down to two things: bad contact or buildup on the sensor probes. Both are easy to fix.
Problem 1: Poor Soil Contact (Air Gaps)
Your smart sensor doesn’t just measure soil; it measures the mix of soil, water, and air. If the sensor probe isn’t making good, firm contact with the soil, it can’t get an accurate reading.
- How it happens: When soil (especially peat-based mixes) dries out, it shrinks and can pull away from the sensor. This creates tiny air gaps.
- Why it reads “wet”: This one seems backward, but stay with me. If you just watered, water can run down the outside of the shrunken soil ball or right along the plastic of the sensor. The sensor probe ends up sitting in a tiny channel of water, while the main root ball next to it remains bone dry. The sensor is technically correct—the area it’s touching is wet—but it’s not representative of the whole pot.
What to do:
- Gently press the soil: After watering, gently press the soil down around the sensor to ensure it’s making full contact.
- The “Wiggle” Test: When you first insert a sensor, don’t just jab it in. Gently wiggle it back and forth as you push it down. This settles the soil particles around the probe and eliminates air gaps.
- Aerate: If your soil is very compacted, use a chopstick to carefully poke a few holes in the soil (avoiding the roots!) before inserting the sensor. This helps water and the sensor get in.
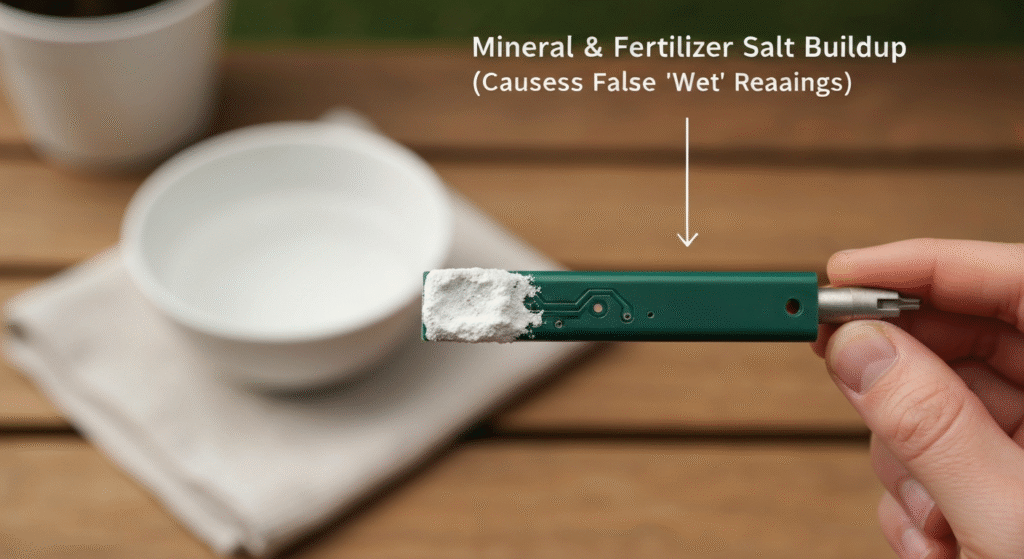
Problem 2: Mineral and Salt Buildup
This is the big one, especially if you’ve had the sensor for a few months. Your sensor is sitting in a complex chemical environment.
- How it happens: Every time you water with tap water, you add small amounts of dissolved minerals (like calcium and magnesium). Every time you use fertilizer, you add mineral salts. When the water evaporates, these minerals and salts get left behind.
- Why it tricks the sensor: These salts build up on the sensor probes as a white, crusty film. This film is highly conductive. Your sensor works by passing a tiny electrical current through the soil—more water equals more conductivity, which equals a “wet” reading. But a crust of fertilizer salts is also highly conductive.
- My Experience: I learned this the hard way with my fiddle leaf fig. I was fertilizing it regularly, and suddenly my sensor readings were stuck at 90%, even when the soil was cracking at the surface. The sensor wasn’t reading water; it was reading the caked-on fertilizer.
What to do:
- Pull it out and clean it: Take the sensor out. You’ll probably see a white or greenish film on the probes.
- Scrub gently: Use a soft cloth or a non-abrasive sponge. For stubborn buildup, a little white vinegar or lemon juice (which are acidic) will dissolve the mineral salts. Just be sure to rinse it well with plain water and dry it completely before putting it back.
- Flush your soil: If your sensor was that crusty, your soil is too. This buildup is bad for your plant. Once every few months, take your plant to the sink or shower and water it thoroughly. Let water drain out the bottom for a good 5-10 minutes. This flushes out the excess salts.
Understanding Your Sensor: Capacitive vs. Resistive
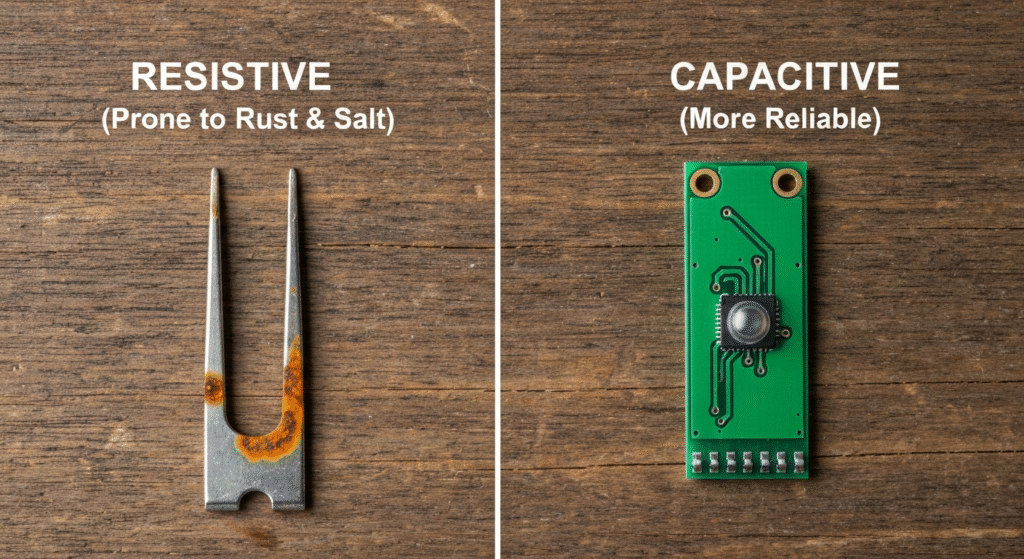
Not all sensors are created equal. The type of sensor you have drastically changes why it might fail. You can usually tell them apart by looking at them.
What is a Resistive Sensor? (The Two Prongs)
These sensors typically have two exposed metal prongs that look like a fork.
- How it works: It measures resistance. It sends a tiny electric current from one prong to the other. Since water conducts electricity, more water means less resistance (a “wetter” reading).
- Why they fail: Those exposed metal prongs are their biggest weakness. They are sitting in wet, acidic soil 24/7.
- Corrosion: The prongs will rust or corrode over time. This rusty layer changes the electrical resistance and throws off the reading, often making it read permanently “dry” or “wet.”
- Salt Buildup: They are extremely sensitive to the salt buildup I mentioned earlier.
When I first started, I bought a 10-pack of these cheap resistive sensors. They were great for about a month, but after that, the readings became completely unreliable. I personally tend to avoid these for long-term plants.
What is a Capacitive Sensor? (The Circuit Board)
These are generally more expensive and look like a green or black circuit board that you stick in the soil. There’s no exposed metal.
- How it works: It measures capacitance. It creates a small electric field around itself and measures the soil’s ability to hold a charge (its dielectric permittivity). Water affects this field way more than soil or air does.
- Why they are better: Because the electronic parts aren’t directly exposed to the soil, they don’t corrode. They are also much less affected by salt buildup. They are measuring the volume of water, not just the conductivity.
So, why would a capacitive sensor be wrong?
They can still be fooled by air gaps (Problem 1) or extreme soil compaction. If the sensor is in a tight, wet pocket while the rest of the pot is dry, it will give you a “wet” reading.
Quick Comparison: Which Sensor Do You Have?
This is a little summary I’ve put together based on my own testing over the years.
| Feature | Resistive Sensor (Two Prongs) | Capacitive Sensor (Circuit Board) |
| How it Works | Measures electrical resistance. | Measures the soil’s capacitance (ability to hold a charge). |
| Common Fail Point | Corrosion and salt buildup. The metal prongs degrade. | Air gaps and poor placement. |
| Accuracy Over Time | Poor. Readings drift as the prongs corrode. | Excellent. Very stable readings over months or years. |
| My Personal Take | Good for short-term projects or for a quick “check.” I don’t trust them for long-term automation. | The standard for reliable smart gardening. This is what I use in all my fussy plants. |
How Your Soil Type Is Lying to the Sensor
Sometimes, the sensor is perfectly clean and placed well, but the soil itself is the problem. Different potting mixes behave in very different ways, creating confusing situations for a sensor.
The “Dry Pocket” Phenomenon (Hydrophobic Soil)
This is a huge problem with peat-based potting mixes.
- How it happens: When peat moss (the main ingredient in most all-purpose potting soil) dries out completely, it becomes hydrophobic. This means it actively repels water.
- What the sensor sees: When you water, the water can’t soak into the dry, hard soil ball. Instead, it finds the path of least resistance—often, right down the inside edge of the pot or along your sensor’s probe.
- The result: Your sensor is sitting in a “wet” channel, reporting 100% moisture. But one inch away, the plant’s root ball is 100% dry and can’t get a drop. This is how you can have a “wet” sensor and a thirsty, dying plant at the same time.
What to do:
- Bottom Water: This is the best fix. Place the entire pot in a tub or sink with a few inches of water. Let it sit for 30-60 minutes. The soil will be forced to soak up water from the bottom, slowly and evenly, rehydrating the entire root ball.
- Aerate: Use a chopstick to gently poke holes all over the soil. This breaks up the hard, dry clumps and creates new channels for water to get in.
- Soil Surfactant: For really bad cases, a few drops of a soil wetting agent (or even a tiny drop of basic dish soap) in your watering can can help. It breaks the surface tension and helps the water penetrate the dry peat.
Compacted Soil and Dense Root Balls
This is common in plants that haven’t been repotted in a long time.
- How it happens: The plant’s roots grow into a thick, dense, tangled mat. This root ball becomes so tight that water can barely get into it.
- What the sensor sees: You’re probably not pushing your sensor into that rock-hard root ball. You’re pushing it into the small ring of looser soil around the edge of the pot. When you water, this outer ring gets soaked, but the center (where the roots are) stays dry.
- The result: Your sensor, sitting in that wet outer ring, reads “Wet.” The roots in the middle are thirsty.
What to do:
- Time to Repot: This is the only real fix. You need to take the plant out, gently break up the root ball (this is called “teasing the roots”), and repot it with fresh, loose potting mix.
- Aerate (Again!): A chopstick is your best friend. Poking holes can provide a temporary path for water to reach the center.
Fast-Draining vs. Water-Retaining Mixes
A sensor calibrated for “potting soil” will be very confused in an “orchid mix.”
- Chunky Mixes (Orchid Bark, Perlite): These mixes are designed to hold almost no water. They are mostly air. A sensor in this mix may read “Dry” almost immediately after watering. But a single piece of sphagnum moss touching the sensor probe could stay wet for days, giving you a false “Wet” reading while the bark around it is bone dry.
- Heavy Mixes (African Violet, Peat): These are designed to hold a lot of water. They will stay “Wet” for a long time.
This isn’t a “problem,” but it’s something you must know. Many smart sensor apps (like Ecowitt or PlantLink) have a setting where you can calibrate the sensor for your specific soil type. If you have it set to “potting soil” but it’s in a chunky aroid mix, your readings will be useless.
A Step-by-Step Troubleshooting Checklist
Okay, let’s put it all together. Your sensor says “Wet,” your finger says “Dry.” Here is the exact order of operations I follow.
- Step 1: Check Sensor Placement. Is it too deep? Too shallow? Is it jammed against the side of the pot? It should be in the middle third of the soil, halfway between the plant stem and the edge of the pot.
- Step 2: Check Soil Contact. Gently press the soil down firmly around the sensor. Give it a tiny wiggle to make sure it’s snug. Wait 15 minutes and check the app reading again.
- Step 3: Pull and Clean the Sensor. Pull it out. Is it crusty with white or green buildup? Clean it with a soft cloth and a bit of vinegar or rubbing alcohol. Rinse, dry, and re-insert. Wait 15 minutes and check the app.
- Step 4: Check for Soil Compaction. While the sensor is out, poke the soil with your finger or a chopstick (in a different spot). Is it rock hard? Is it pulling away from the sides of the pot? If yes, you have hydrophobic or compacted soil.
- Step 5: Aerate and Do a Test Watering. Poke a few holes in the soil. Water slowly and deeply until water comes out the bottom. Watch to see if the water soaks in or just runs down the sides.
- Step 6: Check Your App Settings. Does your sensor app have a calibration feature? Is it set to the right kind of soil? If not, run a new calibration cycle (if your sensor supports it).
- Step 7: The Control Test (Is it Broken?). If all else fails, do this. Get a glass of clean water. Stick the sensor in. It should read 100% (or very close). Now, pull it out and let it air-dry completely. It should read 0%. If it passes this test, the sensor hardware is working perfectly. The problem is 100% in the soil.
When to Trust the Sensor (and When to Trust Your Finger)
After working with smart garden tech for five years, here is my most important rule: A sensor is a tool, not a boss.
Its real power is not in the exact number (85% vs. 82%). Its power is in the trend. I use my sensor data to see how fast a plant is drying out.
- If it goes from 90% to 40% in 3 days, I know it’s a happy, thirsty plant in its growing season.
- If it stays at 90% for two weeks, I know something is wrong (compaction, poor drainage, or it’s winter and the plant is dormant).
My ultimate decision to water is based on three points of data:
- The Sensor Data: What’s the trend? Is it dropping?
- The Finger Test: What does the top inch feel like?
- The Plant’s Appearance: Do the leaves look perky? Is the pot light when I lift it?
When all three of these line up, I water with confidence. If one of them is an outlier (like a “Wet” sensor reading on a dry-feeling plant), I know it’s time to troubleshoot, not to blindly obey the app.
It’s all about understanding what’s happening inside the pot. Different soil mixes hold water in completely different ways. Some hold it like a sponge, while others let it flow right through. (For a deep dive, this guide on managing water in potting media from the Penn State Extension is fantastic.) Your sensor is just giving you one piece of that puzzle.
FAQs: Quick Answers to Common Glitches
Why does my smart sensor always read 100%?
This is almost always due to salt and fertilizer buildup. The sensor is reading the conductive minerals, not the water. Pull it out, clean it thoroughly with vinegar and water, and flush your soil.
Can I use one sensor for all my plants?
You can, but I don’t recommend it. Moving a sensor constantly disturbs the soil and roots. More importantly, a cactus and a fern have wildly different water needs. A “dry” reading for a fern is still “drenched” for a cactus. Sensors work best when they live in one pot and are calibrated for that specific plant.
How often should I clean my sensor?
I check and clean mine every 2-3 months, or any time I fertilize. I just make it part of my routine. If you have very hard water, you might need to clean it more often.
Is my sensor broken?
Probably not. 99% of the time, it’s a soil, contact, or salt issue. Before you give up, do the “glass of water” control test. If it reads 100% in water and 0% in the air, your sensor is working perfectly.
Final Thoughts: Your Sensor is a Partner, Not a Dictator
That “wet-but-dry” reading is a signal. It’s not a failure; it’s your sensor telling you to look closer. It’s telling you that the relationship between the probe, the soil, and the water is out of sync.
Don’t panic or throw the sensor away. See it as a helpful nudge. Use the checklist, clean the probes, check your soil, and you’ll almost certainly find the simple fix. Once you solve it, you’ll have a much deeper understanding of your plant’s environment, and you’ll be able to trust your data again.