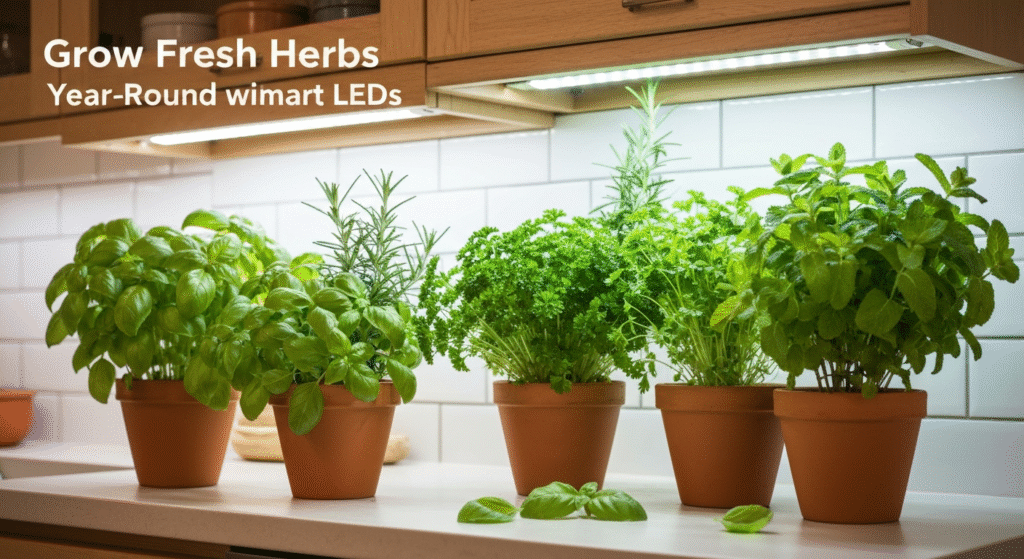
Fresh herbs make any meal better. There’s something special about snipping fresh basil for pasta or mint for tea, right in your own kitchen. But for years, I struggled. My kitchen window doesn’t get enough sun, and my counters are too cluttered for big pots. My first attempts at an indoor herb garden were sad, stringy failures.
That all changed when I brought smart home tech into my garden. The solution was simple, clean, and surprisingly effective: smart LED strips mounted under my kitchen cabinets. Suddenly, I had the perfect, programmable “sun” in a space I wasn’t even using.
Hi, I’m Priya. My journey into smart gardening wasn’t planned. After struggling for years to keep herbs alive on my dim kitchen counter, I decided to combine my two passions: smart home tech and indoor gardening. I’ve spent the last five years obsessively testing different setups, frying a few LED strips with water, and figuring out exactly what makes an indoor herb garden thrive. I’m here to share what I’ve learned, so you can skip the frustration and get straight to the fresh herbs.
This guide is everything I wish I’d known when I started. We’ll walk through picking the right lights, setting them up, and creating the automations that let your garden run itself.
Why Smart LEDs are a Game-Changer for Kitchen Gardens
My first attempt at this used a basic, non-smart “grow light” from the hardware store. It had a clunky plug-in timer that I hated setting. It was either on or off. My plants got the same harsh light, all day, every day. It worked, sort of, but it wasn’t great.
The “smart” in smart LEDs is what makes all the difference.
- Total Automation: This is the biggest win. You set a schedule in an app one time. You can program your lights to turn on at 7 AM and off at 9 PM, and then never think about it again. Your plants get consistent, reliable light, which is what they crave.
- Voice Control: When my hands are covered in flour, I can just say, “Hey Google, turn on the herb lights.” It feels futuristic, but it’s just plain useful.
- Dimming & Control: This is a feature I undervalued at first. When my seedlings were tiny, I could set the lights to 50% brightness to avoid scorching them. As they grew, I ramped it up. You can’t do that with a basic plug-in light.
- Efficiency: Modern LEDs use very little electricity. Running a 10-foot strip for 14 hours a day costs pennies, so I can grow herbs all winter without worrying about the power bill.
It’s not just about light; it’s about controlled light. That control is the secret to a bushy, healthy, and low-effort indoor garden.
Choosing the Right Smart LED Strips: What Really Matters
Walking into the world of LED strips is confusing. You’ll see words like “lumens,” “PAR,” and “5050 chips.” Honestly, you can ignore most of it. After testing several brands, I’ve narrowed it down to a few key things that actually impact your herbs.
Decoding the “Grow Light” Jargon (My Way)
My first “grow light” strip was a purple-ish monstrosity. It worked, but it made my whole kitchen look like a weird science lab. I learned pretty quickly that you don’t need that.
- Spectrum (The Light “Color”): You’ll see “Full Spectrum” advertised a lot. All this really means is that the light includes multiple colors, like blue and red, which plants use for different growth stages. Blue light helps with leafy growth, while red helps with flowering.
- My Experience: You don’t need the intense purple/pink lights. A good “Full Spectrum White” LED strip works perfectly for herbs. These lights look like normal, bright white light to our eyes but have the hidden blue and red diodes mixed in. It keeps your kitchen looking like a kitchen, and my basil and parsley grow just as fast.
- Brightness (Lumens vs. PAR): This is where I made my first mistake. I bought a super-bright office LED strip. It had high lumens (which measures brightness for human eyes) but my plants were “leggy” and weak.
- Here’s the secret: Plants don’t care about lumens. They care about PAR (Photosynthetically Active Radiation). This is the measure of useful light for plants.
- What to do: You don’t need a science degree. Just look for LED strips specifically sold as “grow lights.” They will be balanced for PAR, even if they just look white. Avoid cheap, generic LED strips meant for mood lighting or task lighting.
Smart Features to Look For
The “smart” part is handled by the controller and the app.
- Wi-Fi is Key: Make sure you get a Wi-Fi-enabled strip. Bluetooth-only strips are cheaper but a pain. They require you to be near them with your phone. A Wi-Fi strip connects to your home network, so you can control it from anywhere and, most importantly, connect it to Alexa or Google Assistant.
- The App: The app is where you’ll live for the first 15 minutes. Look for brands that use popular apps like “Smart Life” or “Tuya,” or have their own well-reviewed app (like Govee or LIFX). A bad app makes scheduling a nightmare.
- Voice Assistant Compatibility: Check that box! “Works with Alexa” or “Works with Google Home” is a must-have for me.
My Top Practical Considerations: A Simple Checklist
Here are the non-tech things that I learned matter just as much.
| Feature | Why It Matters (My Lesson Learned) |
| Waterproofing (IP Rating) | This is a must for a kitchen. You will splash water while washing dishes or watering your plants. My first, non-waterproof strip died after a misplaced splash. Look for at least IP65. This means the strip itself is coated in a clear, flexible silicone that protects it from water. |
| Length & Cuttability | Measure your cabinet underside before you buy. Most strips (like 16.4ft / 5m) are way too long. Make sure the strip has clear “cut marks” (usually a little scissors icon) every few inches. This lets you trim it to the perfect length. |
| Adhesive Backing | The sticky tape on the back is crucial. Cheaper strips use weak 3M tape that will fall off after a few weeks from the heat and humidity. I now add a few dabs of hot glue or use the small mounting clips that come in good kits. |
| Corner Connectors | What if you have an L-shaped counter? You can’t just fold the strip 90 degrees. You’ll need “L-shape” or “solderless” connectors. Some kits include them; otherwise, you have to buy them separately. Plan your route first. |
This isn’t a complex lab report, just my hard-won checklist. Getting these few things right from the start saves so much hassle. I’d rather spend 10 extra dollars on a waterproof strip than replace one in six months.
My Step-by-Step Installation Guide (The Non-Scary Version)

Setting this up is a fun 30-minute project. All you need is the LED kit, some scissors, and cleaning wipes.
Step 1: Prep Your Space & Gather Tools
You want the light strip to stick, and stick well. The enemy is kitchen grease.
- Empty Your Counter: Move the toaster, the coffee maker, everything. Give yourself room to work.
- Clean the Surface: This is the most important step. Use an alcohol-based cleaner or a simple degreasing dish soap to thoroughly wipe down the entire underside of your cabinets. Let it dry completely. If you skip this, your lights will be on the counter by morning. Trust me.
- Unroll Your Lights: Plug them in before you stick them, just to make sure the whole strip works.
Step 2: Mapping and Sticking the Strips
Don’t just peel and stick. Do a “dry fit” first.
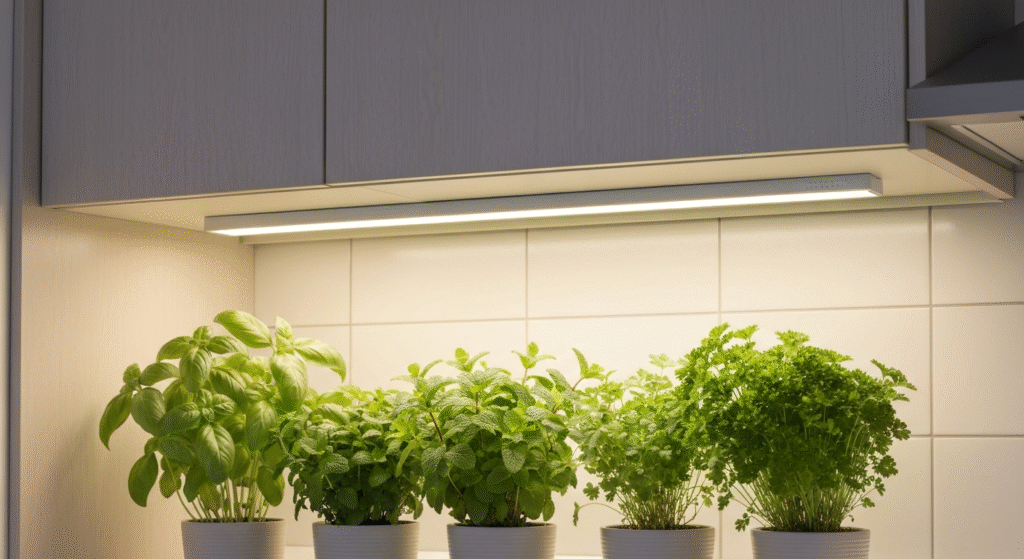
- The Dry Fit: Hold the strip up to the cabinet to plan your path. Where will the power cord go? The best spot is usually near the backsplash, closest to an outlet. You want the strip itself to be hidden from view—about 1-2 inches back from the front edge of the cabinet is perfect.
- My Tape Trick: I use small pieces of painter’s tape to temporarily hold the strip in place. This lets me step back, see how it looks, and make sure the light is hitting my plant area correctly.
- The “Peel and Press”: Once you’re happy, it’s time to commit. Do not peel the entire adhesive backing off at once. It will curl and stick to itself, and you will get frustrated.
- Peel back the first 6-12 inches.
- Press it firmly onto the clean cabinet surface.
- Slowly pull off more backing with one hand while pressing the strip down with the other.
- Go slow. A straight line looks so much better.
- Handling Corners: If you have to make a sharp 90-degree turn, use a corner connector. You cut the strip at the marked line, clip one end into the connector, and clip the next piece into the other side. (Trying to fold the strip can break the circuit).
Step 3: Connecting to the App and Wi-Fi
Here’s the one tech hurdle you might face. I’ve helped a few friends with this, and it’s almost always the same problem.
- Download the App: Your light’s instruction manual will tell you which one (e.g., “Smart Life,” “Govee Home”).
- The 2.4GHz Problem: This is the big one. Most smart devices only work on a 2.4GHz Wi-Fi band. Your home router probably broadcasts both a 2.4GHz and a 5GHz band. Your phone, being smart, likely defaults to the faster 5GHz band. The app can’t find the light strip if your phone isn’t on the same 2.4GHz network.
- My Fix: Go into your phone’s Wi-Fi settings. You will likely see two networks for your home, something like “MyWifi” and “MyWifi_5G.” Temporarily connect your phone to the “MyWifi” (2.4GHz) one.
- Once your phone is on the 2.4GHz network, follow the app instructions to “add a device.” It should find the light strip right away. After setup, you can put your phone back on the 5G network.
Once it’s connected, the fun begins. Name your light something simple, like “Herb Lights,” so your voice assistant can understand you.
Setting Up the Perfect “Sun” Schedule in Your App
This is where your smart garden becomes truly “set it and forget it.” Your goal is to mimic a long, sunny summer day.
How Much Light Do Herbs Actually Need?
Most common kitchen herbs (basil, mint, parsley) are sun-lovers. They need a lot of light to grow bushy and flavorful. If they don’t get enough, they become “leggy”—stretching tall and weak, trying to find more sun.
- My Go-To Schedule: I run my herb lights for 14 to 16 hours per day.
- Give Them a “Night”: Plants need a dark period to rest and respire. Don’t run your lights 24/7. 8-10 hours of darkness is perfect.
My rule of thumb is 14-16 hours of light. This provides the high Daily Light Integral (DLI) they crave. For a more technical breakdown of plant lighting, the guides from university extensions, like this one on lighting for indoor plants, are incredibly helpful.
Building Your First Automation (My “Set It and Forget It” Routine)
Inside your smart app (like Smart Life), you’ll look for a “Schedule” or “Automation” tab.
- Create an “ON” Scene:
- Select “Add Schedule.”
- Set the time: 7:00 AM.
- Set the action: Turn ON “Herb Lights”.
- Set brightness (optional): I set mine to 100%.
- Set repeat: Every day of the week.
- Create an “OFF” Scene:
- Select “Add Schedule.”
- Set the time: 9:00 PM (for a 14-hour day).
- Set the action: Turn OFF “Herb Lights”.
- Set repeat: Every day of the week.
That’s it. You’re done. Your kitchen will now have its own personal sunrise and sunset, and your plants will thank you for the consistency.
What Herbs Grow Best? (And Which to Avoid)
I’ve tried growing almost everything under these lights. Some are superstars, and some are just not worth the trouble. This isn’t a textbook list, but my personal “go-to” list after many failed pots of dill.
The Easy Winners (My “Go-To” List)
These herbs are almost foolproof in an under-cabinet setup. They love the consistent light and don’t get too big, too fast.
- Basil: The number one reason to do this. It grows fast, bushy, and loves the light. You’ll be harvesting leaves in just a few weeks.
- Mint: This one grows like a weed, which is what you want! Keep it in its own pot, or it will take over everything.
- Chives: So easy. They grow like grassy clumps and are perfect for snipping over eggs or potatoes.
- Parsley (Flat-leaf): Another winner. It’s a “cut-and-come-again” plant, so you can harvest the outer leaves, and it will keep producing from the center.
- Lettuce Greens (Loose-leaf): Not an herb, but greens like ‘Black Seed Simpson’ or ‘Arugula’ do fantastically well for “cut-and-come-again” salads.
The Tricky Ones (May Need More Care)
These herbs often can grow, but they’re fussy.
- Rosemary: This is a Mediterranean, woody-stemmed shrub. It hates wet feet and prefers light that’s even more intense than what most LED strips provide. I’ve had some success, but it grows very slowly.
- Thyme: Similar to rosemary, it’s a bit tougher and needs very strong light to avoid getting leggy.
- Dill: My problem with dill is that it wants to grow tall. It quickly outgrows the 18 inches of space between my counter and cabinet.
Here’s a quick summary of my experience:
| Herb | My “Easy” Rating | Why I Love It / Hate It |
| Basil | 5/5 | Loves the light, grows fast. The classic indoor herb. |
| Mint | 5/5 | Almost too easy. Grows aggressively. Smells amazing. |
| Chives | 5/5 | Very low-maintenance. Just needs water and light. |
| Parsley | 4/5 | Great producer. A bit slower to start than basil. |
| Rosemary | 2/5 | Very slow-growing. Needs perfect drainage and intense light. |
| Dill | 2/5 | Gets too tall for an under-cabinet setup very quickly. |
Common Problems I’ve Faced (And How I Fixed Them)
Your setup won’t be perfect on day one. I’ve faced all of these issues. Here are the quick fixes.
Problem: My Plants are “Leggy” and Tall
You’ll see this first on basil. The stems get long and “stretchy,” with small leaves spaced far apart.
- The Cause: The light isn’t strong enough, or it’s too far away. The plant is literally “stretching” to get closer to its food source.
- My Fix:
- Move the Light Closer: Your plants should be 4 to 6 inches away from the LED strip. If your plants are in short pots, use some small boxes or blocks to raise them up.
- Increase the “On” Time: If you can’t move the lights, add two more hours to your daily schedule. Change it from 14 hours to 16.
Problem: The Leaves Have Brown, Burnt Spots
The edges of the leaves look dry, brown, or “burnt.”
- The Cause: The light is too close or too intense. You’re scorching your plants. This often happens with young, tender seedlings.
- My Fix:
- Move the Plants Down: Just give them an extra inch or two of space.
- Use the Dimmer: This is why smart lights are great. Go into the app and dim the “Herb Lights” to 80% or 90%. This is usually enough to stop the burn.
Problem: The App Keeps Disconnecting
You open the app, and it says “Herb Lights – Offline.”
- The Cause: This is almost always a Wi-Fi problem. Your router is too far away, or something is interfering with the 2.4GHz signal (like a microwave or a baby monitor).
- My Fix:
- Reboot Everything: Unplug the light strip, wait 10 seconds, and plug it back in. Reboot your router. This fixes 90% of my smart home glitches.
- Check Signal: If it keeps happening, your router might be too far from the kitchen. You may need a simple Wi-Fi extender to get a more stable 2.4GHz signal to that corner of your home.
Beyond the Basics: My Favorite Smart Garden “Hacks”
Once you have the basics down, you can do some really cool things.
- Integrate a Smart Plug: I have my small herb-watering can on a tray with a tiny (and cheap) smart water leak sensor. If I overfill and it leaks, I get an alert on my phone.
- Create “Scenes”: In my Alexa app, I created a “Scene” called “Kitchen Morning.” When I say “Alexa, start my morning,” it turns on the main kitchen lights, starts my smart coffee pot, and turns on the herb lights.
- Vacation Mode: If I go away for a weekend, I change the schedule in the app to be shorter (maybe 10 hours) so the plants slow their growth and use less water while I’m gone.
Frequently Asked Questions (My Quick Answers)
1. Can I use any smart LED strip?
Not really. You should avoid the cheap, color-only “RGB” strips meant for mood lighting. They lack the full-spectrum white light that plants need. Always look for a strip that is specifically sold as a “grow light” or “full spectrum white.”
2. Will this raise my electricity bill?
Barely. A typical 16-foot LED strip uses about 15-20 watts. Running that for 14 hours a day costs less than $1-2 per month in most places. It’s far cheaper than running a big, hot incandescent bulb.
3. Do I need special pots or soil?
You need two things: 1) Any pot with a drainage hole at the bottom. This is non-negotiable. 2) A good quality, sterile “potting mix” (not heavy “garden soil”). That’s it.
4. How often do I water?
This is the number one killer of indoor plants. My rule: stick your finger one inch into the soil. If it feels dry, water it. If it feels damp, wait another day. With the strong lights, you’ll probably need to water every 2-3 days.
My Final Thoughts: Is It Worth It?
One hundred percent, yes.
The setup takes less than an hour, and the cost is minimal. But the payoff is huge. It’s not just about having fresh herbs, which is fantastic. It’s about adding a patch of vibrant, green life to your kitchen, especially in the middle of winter. It makes the whole space feel more alive.
Combining smart home automation with gardening has been one of my favorite projects. It takes the guesswork out of plant care and guarantees success. You get to enjoy the fun part (harvesting and eating) without the stress of wondering if your plants are getting enough sun.